2022.12.09
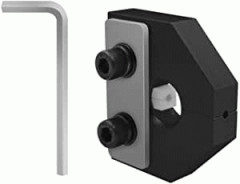
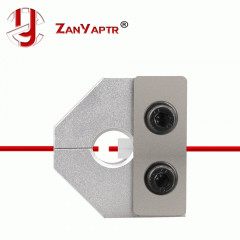
Amazonで3000円
手持ちのテフロンチューブの両側からフィラメント突っ込んで250℃ぐらいで加熱しつつ押し付ければよいんだよね?
使い方は
- 1.接続する必要がある2つのフィラメントヘッドをトリミングします。(Trim the two filament heads that need to be connected.
- 2.一方の端がフィラメント溶接機の大きな端の方向から目盛りまで通過します。(One end pass-through from the direction of the big end of the filament welder to the tick mark.
- 3.もう一方の端は、小頭の方向から露出した1〜2mmまで通過します。(The other end pass-through from the direction of the small head to the exposed 1-2mm.
- 4.5〜7秒間火で燃やす。 (この時間は主に通常のプラ、腹筋用です、他の硬いフィラメントは少し長くする必要があります)(Burn with fire for 5-7 seconds. (This time is mainly for ordinary pla, abs, other harder filament should be slightly longer)
- 5.その後、フィラメントを小さな端から大きな端の小さな穴にすばやく押します (速くてはいけません)。(Then quickly push the filament from the small end into the small hole at the big end, slowly (must not be fast).
- 6.関節が露出したら、ゆっくりと前後に数回引き戻します。(Then slowly pull back when the joint is exposed, back and forth several times.
- 7.フィラメントが完全に冷却された後、フィラメントは簡単にトリミングできるようになるまで小さな先端から完全に押し出します。(After the filament is completely cooled, the filament is completely pushed out from the small head end until it can be easily trimmed.
- 8.修理が完了したら結果をテストします (joint - straighten - bend - straightenを慎重に曲げます)。(Test the results after the repair is completed(carefully bend the joint - straighten - bend - straighten).
- 9.鮮明な音が出た場合は、再度溶接する必要があります。(If you hear a crisp sound, we need to weld again.
- 10.接続ピースのウエスト溝の一方の端にあるボルトを取り外し、フィラメントを取り出し、次の使用のためにフィラメント溶接機を組み立てます。(Unscrew the bolt at one end of the waist groove the connecting piece with, take out the filament, and assemble the filament welder for the next use.
Category:【2台目】Flsun(中華)のデュアルヘッド大型3Dプリンター #3Dプリンター
■ ■ ■ コメント ■ ■ ■
いいっすね!=6
001 [12.09 22:53]ふぇちゅいんさんふぁん(ゆるりゆラリー)★91:光ケーブルの融着の練習になりそう。 ↑(2)
本カテゴリーで直近コメントが書かれた記事
→カテゴリー:【2台目】Flsun(中華)のデュアルヘッド大型3Dプリンター #3Dプリンター(記事数:148)
本カテゴリーの最近の記事(コメント数)


